[quote]tcsimon wrote:
Some things for you to consider:
-
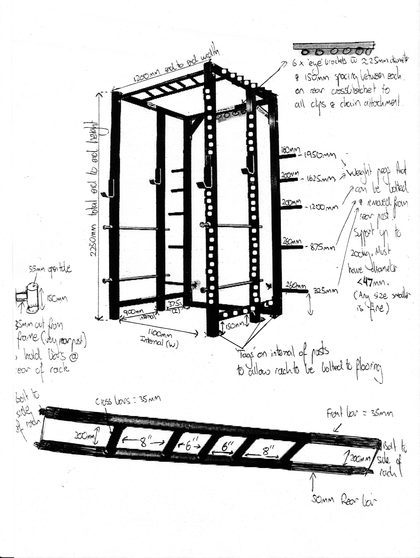
It may by that I’m getting old and lazy but I would put the larger plate storage closer to where it is most likely to come on and off the bar. Why lift the 45’s from the floor to the bar and then have to lower them back down when you are done when you could just move them horizontally.
-
I can’t tell for certain in your diagram but I would recommend having holes for the band pegs on the upper and lower horizontal portions of the plate storage area. This is for a few reasons. First if you wanted to pull aganst bands you could have enough distance between the front and back pegs so that you could have band tension at the floor without having to double up the bands. Second, you can set up for benching with an “L” configuration and have enough distance to adjust your tension without having to double up the bands over a single peg. Same for on the top, you can have more configurations and thus be able to fine tune how much band tension you have for reverse band work. Adding 4 or 5 holes x 4 sections of tubing isn’t going to add that much to the cost and won’t sacrifice any strength. It’s cheaper to have them and not use than to not have them and have to add them later.
-
5 mm wall is overkill. The majority of the load is on a vertical column. Granted it is offset slightly when the bar is in the hooks but the resulting bending moment is very slight given the short distance from the column (post) Even still, 11 gauge (0.120 in.) wall or 3 mm wall is satisfactory. Having made many pieces of my own I can say from experience, the material cost savings going from 5 mm to 3 mm will be substantial and you will never hav an issue with lack of strength due to the thinner wall. Weight of the assembled rack is really not an issue once it’s in place. Something to consider, the price for steel is a function of it’s weight (and to a lesser extent configuration, i.e. round pipe, square tube, solid round bar…) The closest comparison I found was for 2.5 inch x 2.5 inch square tube. For 3/16 inch (4.76 mm) wall it weighs 5.59 lbs per foot and for 0.120 inch wall (3.05 mm) it weighs 3.9 lbs per foot. Take the money you save a have a nice bench made. PM me with your email and I can send you a measured drawing and pictures of the one I made and a list of things that I would change if or when I were to make it again.
-
I can’t tell from your diagram but the spacing between the plate stoage post and the center post of the rack should be such that your largest plate (45 lbs in US) should be able to fit between the posts with ample clearance. Technically you need a radius from the center line of the storage post and a radius from a bar pressed against the front of the center post so that the plates on the bar can’t bump the plates on the storage rack.
-
I would position base plates with the holes that fasten the rack to the floor such that I had enough clearance above them to drill my holes without having to reposition the rack. This would also ensure that I hade enough room to insert a long fastener if required. If going into concrete I recommend a stud style achor in the floor with a nut and washer to hold the rack down. For a wood floor use a “lag” screw.
-
From experience we have learned that when using a “L” type band config, the peg at the crotch of the “L” needs to be able to spin. If not, when you lower the bar the band creeps and the tension will increase with every rep. We slide a small piece of PVC pipe over the peg and secure the peg through the rack with a 1 inch spring clip (our pegs are 1 inch diam.) It really sucks if the PVC pipe walks off the end of the peg when during a circa max squat session, (I’ve found a few fragments but the majority of it seems to have vaporized when it impacted the concrete wall at what I estimate to be at near the speed of sound).
-
I would alter the monkey bars to that the ends were angled like this /----\ when viewd from the front so it’s a little easier on the wrists and grip when you do wide grip pull-ups. Paint the monkey bars with spray on truck bed liner, it has a very durable texture and offers a great grip. Find out where the new trucks go and see what they guys there charge. The stuff in the rattle can isn’t that great.
I am a mechanical engineer with almost 20 years experience in machine design and I also manufacture all of my own weight training equipment, as well as some for sale so some of what I am saying has a little credence. Most of what I’ve suggested is very minor from a design change perspective but are things that would be very difficult to change once fabricated.
Sorry for the longwinded response. In general your design looks great, it has all of the things that I will include on my dream rack once I get around to building it. The important part is that it is what you want and will serve your needs.
[/quote]
Firstly, thanks so much for taking a look at the design. As I said, I don’t have any engineering background but just kinda looked at what i wanted and tried to apply what I could.
-
I did think about the plate storage, but I was a bit torn because I may not always be able to bolt down my equipment and therefore I wanted the heavier weights nice and low…but that may be some crappy knowledge of physics. I figure I have two pegs for 450mm plates and then 3pegs for decreasing plate size above those on each side. In hindsight…I would have followed your advice (already in construction).
-
Arrgghh… wish I had known this. I saw other racks with this but didn’t quite know if I should have it. I was worried about turning my rack into swiss cheese and not having enough strength (told you I was no engineer!). I might give them a call and see if they can drill the holes in the bottom section to save doubling up bands for deads but I don’t think I will use the ‘L’ banding. I’m just not that full on to warrant adjusting the tension in such small increments. I do however think it’s worth me getting the bottom and top holes all the way across the rack. I’ll just have to take off any plates on the bottom weight storage pegs as otherwise they would interfere with the band.
3)ha ha… the 5mm costs me the same as the 3mm. It’s a cash job and when I asked for 3.5mm they said “we don’t have 3.5mm… but we can do 5mm for the same price?” so I was like “More must be better…hell yeah!” Maybe that wasn’t the best idea…but at least I know it will be able to hold a decent amount of weight. I get what you mean, and if it had cost me more I would have downgraded to 3mm…but for the same price I thought why the hell not. Basically, these guys were recommended to me by a client who gives them a LOT of work so I think they are looking after me very well to keep him happy.
4)Cheers mate… i only remembered that bit about 2days before i took the final drawings in! I smacked myself in the head for being so stupid not to think of it earlier. I’ve left a good clearance so that I can have a bar sitting right up against the middle post with 450mm plates and it won’t touch the 450mm plates on the storage pegs.
5)Ahhh… i didn’t think about that bit. Bummer. I have the ‘tags’ (as i now know they are called) on the internal underside but this was partially to reduce space. Standard ply over here comes in 1200mm x 2400 and so to keep the rack within the 1200 I kept the tags internal. When I first designed it, I wasn’t allowed to bolt into the floor so was going to use a few sheets of ply with a metal bracket insert cut in the middle of 3 pieces so that I could bolt the rack into the bracket. Using equal and opposite forces, any forces applied to the rack trying to lift it up (say with bands) would also be opposed by forces pushing the floor down and therefore as long as strong bracket and bolts, no issues. As it turns out, I have since been given permission to bolt straight to the floor so intended to use bolts and washers. Now can you explain what this ‘stud’ anchor is? Someone has recommened dyna boltsbut not sure what they are either.
-
Geez… that sounds a bit full on. Yeah… that only helps convince me that I’ll stick to my simple band setup. It may not be as precise, but I know what is going where.
-
It may sound werid, but I actually prefer a straight bar. I have tried 10, 15, 20, 30 degree angled bars after taking some advice from readers here and I actually prefer a straight bar to do chins. Very good advice on the spray…will have to look into that. The chin bar can easily be unbolted so once I find a place I will have to go get that done. I’m guessing it leaves that rough textured surface huh? Great tip!
Geez… with all this advice I’m hoping you can help me with something else.
I’m going to build my own oly platform and I happen to have ‘found’ 4 sheets of 1mx1m 1&1/2 inch thick rubber mats! Freakin heavy, strong, and perfect for lifting.
I was looking at (due to room size) having squat rack, then platform straight in front. Now…I only have 4sq metres of mat so how do i best organise so that I can make a good platform AND have some mats next to the rack to allow deadlifts without heaps of noise.
I had considered:
Cut all mats so half are 1m x 0.6m and half are 1mx0.4m
Then, use wider (0.6m) mats each side of 1200mm X 2000mm ply platform (3layers) so that I have a platform that is 2metres long and 2.4metres wide with the rubber taking up 600mm each side.
Then, use the 400mm lengths each side of the rack so that I have 400mm x 2metres each side and I guess I would have to put something inside the rack to build it up…again…probably 3 sheets of 1200mm x 2000mm ply.
Does this sound alright to you?
I would be able to walk up on to a platform, then walk into cage at same height. Drop weights on to some good rubber and the ply would be easy to fit. Just not sure if ply is a good choice for inside the rack (slip?).
Thanks so much for your input… it has definitely helped me with doubts I had regarding the design and, although I could have improved it, I think it will provide a very functional unit that fits my limited space.
FWIW I’m now looking at getting my own ‘torsonator’ or ‘landmine’ or whatever you want to call it made so that I can just attached it to the front of the rack. Just looks like a universal joint with a tube to hold the oly bar. Add a threaded bolt and a nut and it can’t cost $400USD like most are charging!
Look forward to your input on the matting/floor layout as I suspect you have a lot of experience in this too!
Cheers